

How does a Canadian edit their /etc/hosts file? With an eheditor...
eheditor
From time to time, I need to do local development masking as the production
domain name I'm testing for. This usually involves editing the /etc/hosts file
and that's the necessity behind the eheditor command-line program.
This process of manually editing the file isn't bad at all if the person editing
the file knows how and what to do, as well as what not to do. This is also
complicated if the IP address used to do the /etc/hosts entry changes based on
whatever a given domain name is pointing to.
This is why I took the time to push the limits of CTK a little and build a
command-line program for editing these /etc/hosts files. The requirements are
basically as follows:
- associate comments with specific entries
- allow for stand-alone comments (for when someone reads the file directly)
- allow for activating and deactivating any given entry (comment/uncomment lines)
- be able to setup an entry backed by a domain name lookup for the IP address
- must use CTK (because that's kinda the point of this exercise)
- must be at least somewhat easy to use for non-terminal-minded people
It didn't take long to get an initial version running and after a few months of real-world use, a number of bugs were fixed and the user-interface completely rewritten and redesigned.
There is a problem though with this setup, CTK only really has support for two
user-interaction widgets, ctk.Button and ctk.Entry. This means that there are
no "notebooks" (screens with tabs at the top to select different pages), there
aren't any "tree views" (like some file managers have a hierarchical tree that
can have branches expanded and collapsed)... in general there's not a lot of the
actual GTK widget set implemented at this time. This means that I had to get a
little creative with how to mimic these user-interface features and layouts.
Let's take a look at the current state of the eheditor!
Installation
As with all of the Go language projects I work on, the common and easiest installation is pretty simple:
# note: requires go v1.22.6
> go install github.com/go-coreutils/etc-hosts-editor/cmd/eheditor@latest
Here's what the --help output looks like:
> eheditor --help
NAME:
   eheditor - etc hosts editor

USAGE:
   eheditor [options] [/etc/hosts]

VERSION:
   0.8.0 (trunk)

DESCRIPTION:
   command line utility for managing the OS /etc/hosts file

GLOBAL OPTIONS:
   --read-only, -r      do not write any changes to the etc hosts file
   --help, -h, --usage  display command-line usage information
   --version, -v        display the version
Walkthrough
Let's take a little walkthrough editing the example /etc/hosts file included
in the project's Git repository.
###
# this is an example /etc/hosts file
###

127.0.0.1	localhost

# The following lines are desirable for IPv6 capable hosts
::1     localhost ip6-localhost ip6-loopback
ff02::1 ip6-allnodes
ff02::2 ip6-allrouters

#1.2.3.4 some.domain.name

4.3.2.1 another.domain
When this file is loaded and then saved after making any changes, the entire file will get rewritten. We'll see what that looks like as we continue the walkthrough.
First view of the example.etc-hosts
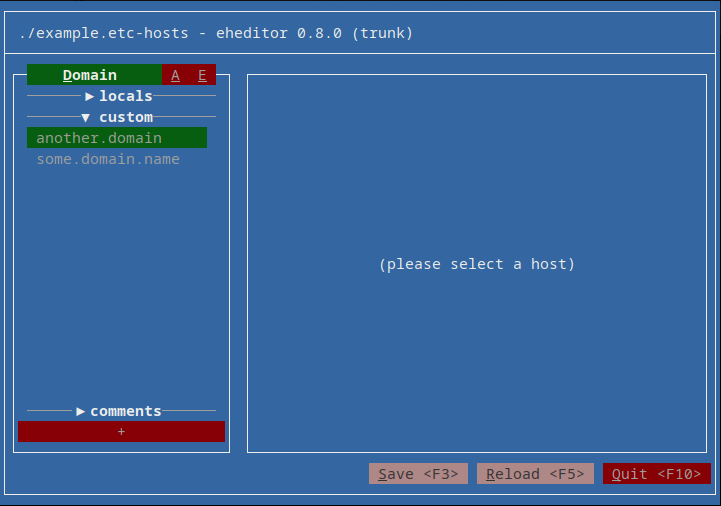
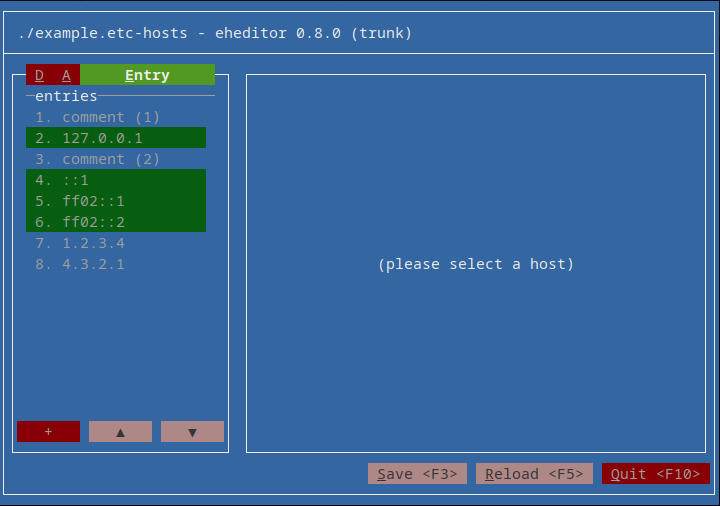
At the top of the screen it tells you the file name, the name of the program (eheditor) and the version.
On the sidebar to the left, there are three "tabs" ("Domain", "A" and "E") and three sections in the sidebar content area ("locals", "custom" with the "custom" one already expanded, and the "comments" one at the bottom).
To conserve space, only the current tab has it's Name displayed. The following
table lists the different tab names and their descriptions:
| Name | Short | Description |
|---|---|---|
| Domain | D | list entries by domain name |
| Address | A | list entries by IP address |
| Entry | E | list entries by entry |
So, at this point, we're looking at the "Domains" listing and we can see that
the another.domain entry is highlit green because it's active (not commented
out with a leading # symbol) and the some.domain.name entry is greyed out
because it is not active (is commented out with a leading # in the file).
All of the other entries in the file relate to either IPv4 or IPv6 localhost and/or routing stuff. These are separated from the "custom" domains in the listing because most of the time, these local entries aren't that important for humans doing work and are actually important for the operating system to function on the internet. So, to not encourage possibly breaking those entries when non-technical users are editing, they're tucked in a collapsed "locals" section of the sidebar.
Here's what it looks like when we click on the "locals" section:
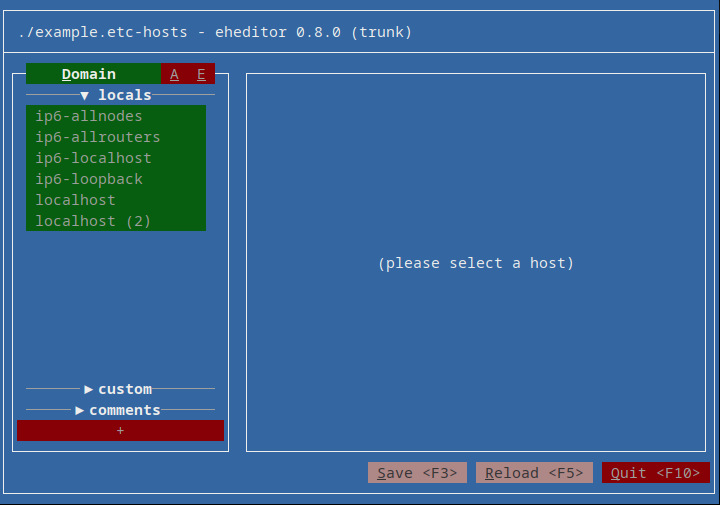
All of these are active of course because the operating system needs them. Note that
there are two localhost entries, one of which is localhost (2), when the same
domain name is used for both IPv4 and IPv6, the IPv6 one gets the extra number in the
label. Not pretty but it works.
Now let's take a quick look at the "comments" section of the sidebar (at the bottom of the sidebar, above the big "+" button).
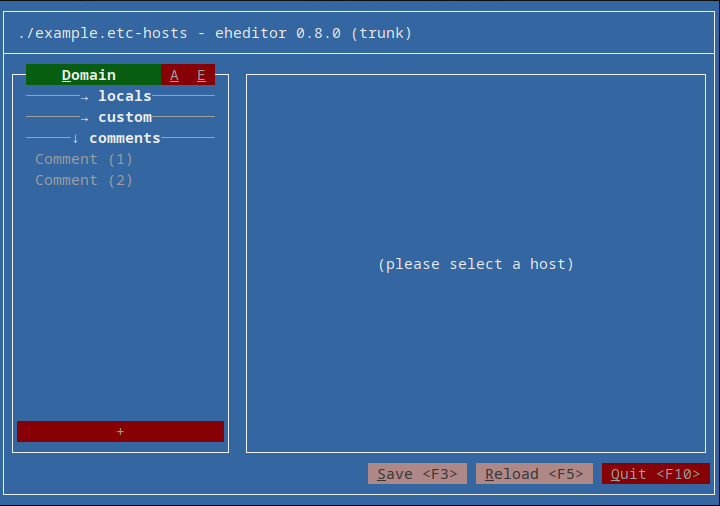
Here we can see that two comments were detected. Given that comments don't have any
names themselves, they're just listed as Comment (<number>) where the number is the
order of the comments present in the file.
Selecting a comment entry
Knowing that the number in the comment entry names indicates the order of the comments
detected in the file, the first one should be the first block of # characters:
this is an example /etc/hosts file. Let's take a look:
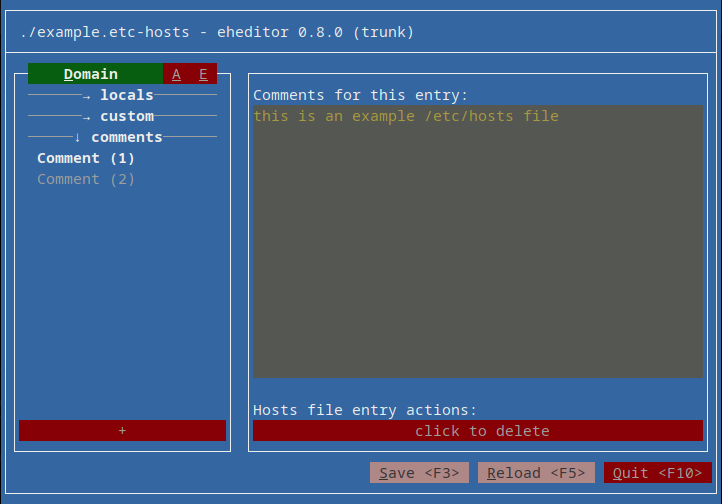
Correct! That's the first comment, without any of the # characters, found in the file.
The eheditor, once the file is saved the first time, will modify these comment
entries into more formal comment styles that when editing again with the
eheditor, it'll pick them up correctly based on their association with an
entry or if they're just stand-alone comments in the file.
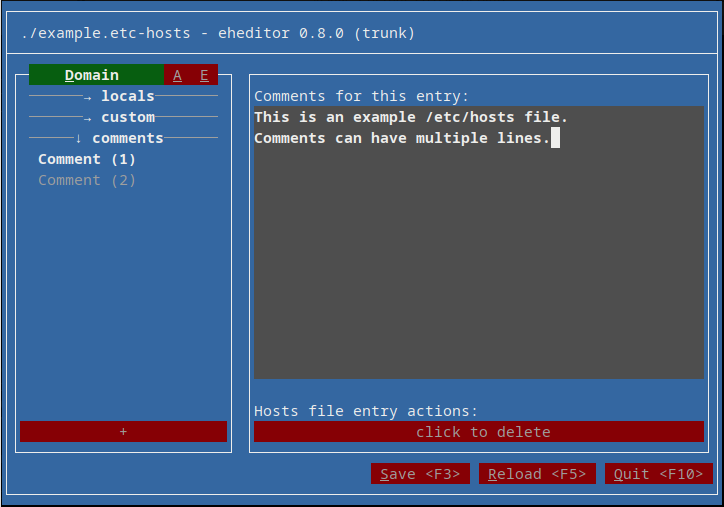
We can also see what the main content region of the eheditor looks like. It has a big
editable text field (called a ctk.Entry) and a button to delete that entry.
Let's change the comment and save the session to see what the file looks like after the first save without actually changing any of the configured hosts.
We can now see that the "Save" and "Reload" buttons can now be clicked. Let's click "Save" and see what the file looks like now.
## eheditor wrote this file

###
# This is an example /etc/hosts file.
# Comments can have multiple lines.
###

127.0.0.1	localhost

###
# The following lines are desirable for IPv6 capable hosts
###

::1	localhost ip6-localhost ip6-loopback

ff02::1	ip6-allnodes

ff02::2	ip6-allrouters

#1.2.3.4	some.domain.name

4.3.2.1	another.domain
We can see that the file did in fact change. The second comment is no longer on
just one line, it's now it's own full comment "block". We can also see that all
of the host entries are now separated with empty lines, and probably most
importantly is the initial header line stating that eheditor wrote this file.
Okay, so not bad, it didn't clobber anything. Let's move on to the "custom" host entries and see what they look like.
Selecting a custom host entry
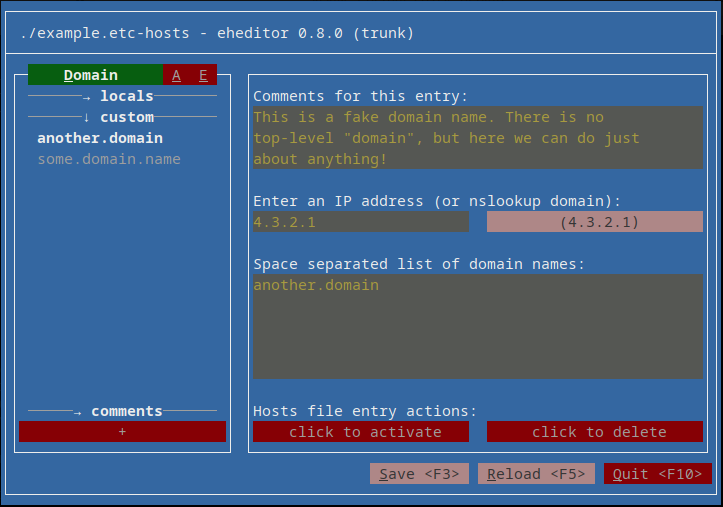
After clicking on the "custom" section in the sidebar, and then selecting the
another.domain entry, the screen looks like this:
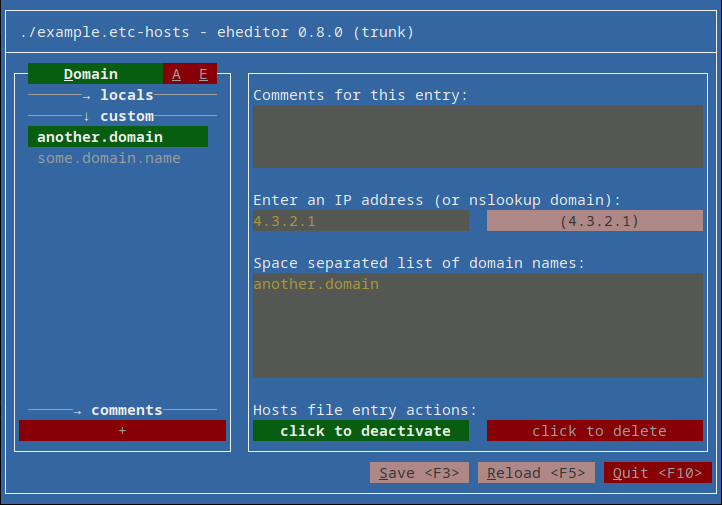
Here we can see that the main content area is different than the simple comment editing screen.
At the top is the comment text entry for this host entry, next is the IP address that this host domain is to point to and then there is another text entry for supplying a space (or newline) separated list of the domain names to associate with the specified IP address.
There is also an insensitive button labelled (4.3.2.1) which we'll take a look
at in the next section of this walkthrough. Let's ignore it for now.
Finally at the bottom there are now two big buttons, one labeled "click to deactivate" and the other is the "click to delete". Pretty self explanatory even if verbose. The deactivate button is currently displayed green indicating that the entry is in fact active right now. Doing nothing else right now, just clicking that button will comment out the entry. Let's do that, save and check the file again.
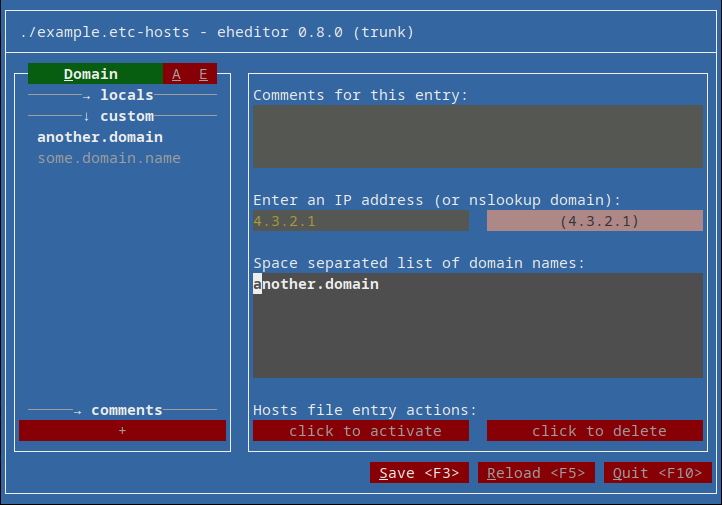
Okay, so that's what the screen looks like after pressing deactivate. Pressing save and checking the file contents again:
## eheditor wrote this file

###
# This is an example /etc/hosts file.
# Comments can have multiple lines.
###

127.0.0.1	localhost

###
# The following lines are desirable for IPv6 capable hosts
###

::1	localhost ip6-localhost ip6-loopback

ff02::1	ip6-allnodes

ff02::2	ip6-allrouters

#1.2.3.4	some.domain.name

#4.3.2.1	another.domain
Okay! So, nothing special. Just added a # to the start of the 4.3.2.1 line. Let's give it
a comment and check that again.
## eheditor wrote this file

###
# This is an example /etc/hosts file.
# Comments can have multiple lines.
###

127.0.0.1	localhost

###
# The following lines are desirable for IPv6 capable hosts
###

::1	localhost ip6-localhost ip6-loopback

ff02::1	ip6-allnodes

ff02::2	ip6-allrouters

#1.2.3.4	some.domain.name

# This is a fake domain name. There is no
# top-level "domain", but here we can do just
# about anything!
#4.3.2.1	another.domain
Neat! Again, nothing fancy, just added the comment I just wrote for the entry.
That's basically the whole thing, but let's continue to walk through all the different screens, views and that "nslookup" feature.
Listing by Address
Here's what clicking on the "Address" tab of the sidebar looks like.
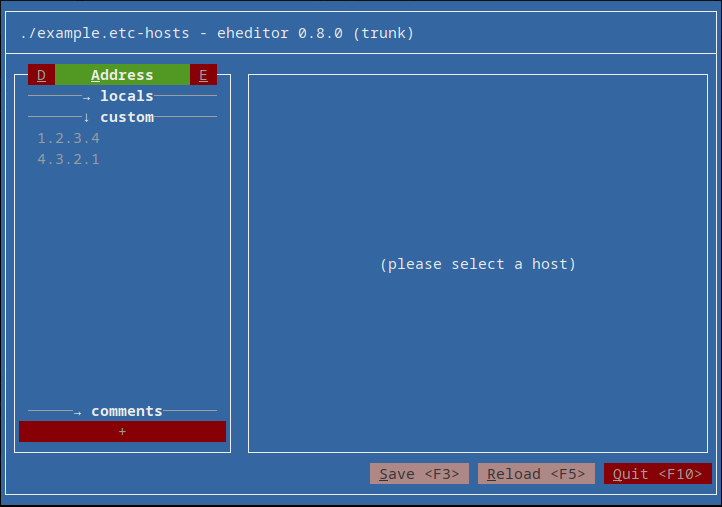
Same entries, just listing their IP addresses rather than the domain names.
Listing by Entry
Clicking on the "Entry" tab of the sidebar looks like this:
This one is actually different than the other two in that there are no sections to the list, all of the entries are shown, in the same list, in the order they appear and hosts are listed with the address.
Using the nslookup feature
Okay, this one is a little complicated. When you need to test a development release
before deploying it to production, sometimes it's necessary to actually use an entirely
secondary webhost that is configured identically to production, with the production
domain names, but never actually has the official domain name pointing to it (also usually
behind corporate firewalls with private intranets or whatnot). In cases like this, to
test the deployment on the fake production (staging) host, that's where the "nslookup"
feature can be of convenient use. These staging hosts are given domain names, just not
the "official" ones used on production. Sometimes like staging--www.domain.name and
they usually have nothing to do with the official domain name (for security reasons).
If you're not familiar with the name, there is actually another command line program, typically present with most operating systems, called "nslookup" and all it does is tell you the IP address for any given domain name. For example:
> nslookup duckduckgo.com
Server:		1.1.1.1
Address:	1.1.1.1#53

Non-authoritative answer:
Name:	duckduckgo.com
Address: 40.89.244.232
Here we can see the DNS server my computer just used to lookup the address and the response received includes an IP address. So, normally, one would run that command with the staging domain name and then use that IP address with the official domain name mapping to that. Then when you visit the official domain name, your compute will actually think that the staging host is the production one and now you can test the deployment work. Of course there are typically issues with SSL certificates due to the inconsistent domain names but for testing purposes, cases like these warrant the click-through of the warnings to get to the site anyways.
We're not going to actually demonstate the whole process, but we are going to
see how the "nslookup" feature within eheditor works and what it produces in
the hosts file.
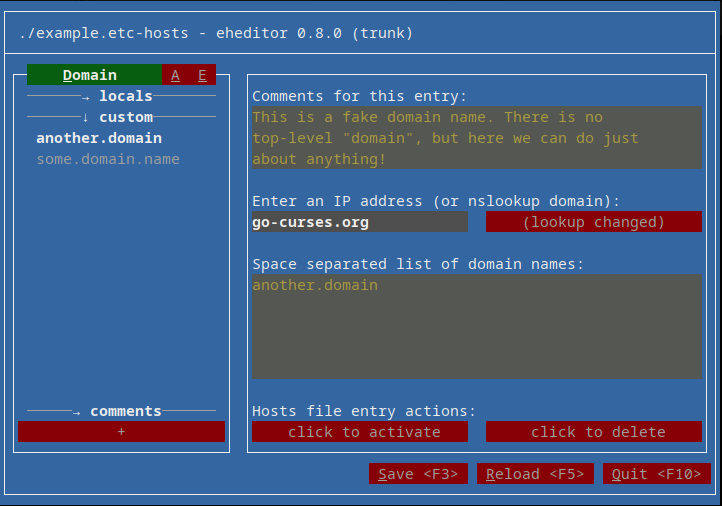
So, let's go back to the another.domain entry. Here's that screen again:
And here we're replacing the 4.3.2.1 IP address with the go-curses.org
domain name. The button to the right is sensitive and now reads (lookup
changed).
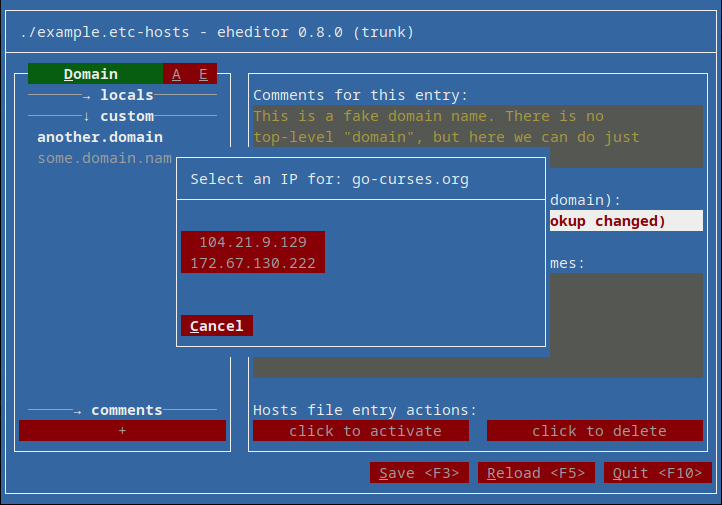
Clicking on the (lookup changed) button pops up a dialog with a list of IP
address buttons to pick from. These are the IP addresses returned from
performing the equivalent of an nslookup command but from within Go directly
(eheditor does not need nslookup to be present).
Clicking on one of the buttons will select that address. Here's what that looks like.
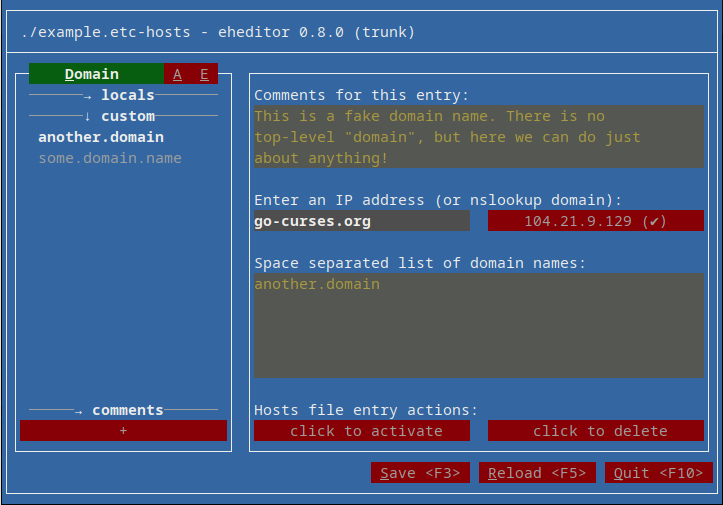
The domain name go-curses.org still appears in the address field but the
button now displays the IP address I just clicked on.
After pressing save, let's see what the file looks like now:
## eheditor wrote this file

###
# This is an example /etc/hosts file.
# Comments can have multiple lines.
###

127.0.0.1	localhost

###
# The following lines are desirable for IPv6 capable hosts
###

::1	localhost ip6-localhost ip6-loopback

ff02::1	ip6-allnodes

ff02::2	ip6-allrouters

#1.2.3.4	some.domain.name

# This is a fake domain name. There is no
# top-level "domain", but here we can do just
# about anything!
#nslookup go-curses.org
#104.21.9.129	another.domain
The entry is still not active, so it's commented out on the address line but there's
an extra comment starting with the exact text: #nslookup and a space and then the
domain name used for making the nslookup call. This is how eheditor knows the correct
domain name to use the next time eheditor is used to edit the hosts file.
Conclusion
I'm sure there are bugs and oddities so please don't use eheditor without backing up
your /etc/hosts file first and also playing around in the eheditor to see if it's
even something you're comfortable with.
In any case...
Enjoy!